Vision Five 2
The VisionFive 2 is a RISC-V quad-core board from StarFive. A useful resource for getting started is the official Quick Start Guide, which explains how to connect a UART to the board and install a default image.
This guide covers how to build a Miralis image for the VisionFive 2 and how to install it on the board. Before starting, ensure that an OS image has been flashed on the SD card (see section 3.3 of the Quick Start Guide) and that the board boots properly with the default configuration. The shell commands below assume the current directory is the root of the Miralis repository.
Building a Miralis Image
This section first gives an overview of the process of building the firmware image, and then provides a summary of the steps required to build a Miralis image at the end of the section.
Overview
Miralis comes with a configuration file for the VisionFive 2. To build a compatible Miralis binary, simply run:
just build config/visionfive2-release.toml
The Miralis binary needs to be packaged into a proper FIT image that can be loaded on the VisionFive 2.
To do so, first install the mkimage U-Boot tool.
mkimage creates firmware images (FIT images) that can be flashed on the VisionFive 2.
A FIT image is created from an Image Tree Source file (ITS, with a .its extension) and firmware binaries.
The ITS file lists the paths of the firmware binaries to include and their layout in memory.
Here is an example of an ITS file for the VisionFive 2:
/dts-v1/;

/ {
        description = "U-boot-spl FIT image for JH7110 VisionFive2";
        #address-cells = <2>;

        images {
                firmware {
                        description = "miralis";
                        data = /incbin/("../target/riscv-unknown-miralis/release/miralis.img");
                        type = "firmware";
                        os = "u-boot";
                        load = <0x0 0x43000000>;
                        entry = <0x0 0x43000000>;
                        compression = "none";
                };

                virtual-firmware {
                        description = "virtual firmware";
                        data = /incbin/("./visionfive2_fw_payload.bin");
                        type = "firmware";
                        arch = "riscv";
                        load = <0x0 0x40000000>;
                        compression = "none";
                };
        };

    configurations {
        default = "config-1";

        config-1 {
            description = "U-boot-spl FIT config for JH7110 VisionFive2";
            firmware = "firmware";
            loadables = "virtual-firmware";
        };
    };
};
This ITS file lists two firmware images: one named firmware, which contains the Miralis binary, and another named virtual-firmware, which contains the StarFive firmware (OpenSBI with a few patches).
The data field of the ITS lists the paths to the binaries. In the above file, we use the release build of Miralis and assume that the VisionFive 2 firmware is named ./visionfive2_fw_payload.bin.
The load field specifies the load address for the binaries.
For compatibility with the VisionFive 2 firmware, we do not change the load address of the VisionFive 2 firmware (at 0x40000000), but we set the entry point for Miralis at 0x43000000.
The VisionFive 2 firmware can be either built from source or extracted from the official FIT image.
To extract the firmware binary, download the FIT image (visionfive2_fw_payload.img) from the release page, and install dumpimage (often bundled with mkimage), then run:
dumpimage -T flat_dt -p 0 -o fw_payload.bin visionfive2_fw_payload.img
This will extract visionfive2_fw_payload.bin from the FIT image.
A new FIT image with Miralis can then be created using the mkimage tool:
mkimage -f artifacts/visionfive2.its -A riscv -O u-boot -T firmware artifacts/miralis_visionfive2.img
Summary: building the Miralis image
-
Build Miralis for the VisionFive 2:
just build config/visionfive2-release.toml -
Extract the VisionFive 2 firmware (
fw_payload.bin):cd artifacts
curl -L -O https://github.com/starfive-tech/VisionFive2/releases/download/JH7110_VF2_515_v5.14.0/visionfive2_fw_payload.img
dumpimage -T flat_dt -p 0 -o visionfive2_fw_payload.bin visionfive2_fw_payload.img
cd ..This will extract the VisionFive 2 firmware to
artifacts/visionfive2_fw_payload.bin. -
Copy the ITS file above (the one starting with
/dts-v1/;) toartifacts/visionfive2.its. -
Generate the FIT image using the
mkimagecommand:mkimage -f artifacts/visionfive2.its -A riscv -O u-boot -T firmware artifacts/miralis_visionfive2.imgThis will create the FIT image at
artifacts/miralis_visionfive2.img.
Flashing the Miralis Image
The Miralis FIT image can be installed on the VisionFive 2 through the recovery bootloader. The recovery images are available at https://github.com/starfive-tech/Tools/tree/master/recovery. You can download it with:
curl -L -o artifacts/jh7110-recovery-20230322.bin https://github.com/starfive-tech/Tools/raw/refs/heads/master/recovery/jh7110-recovery-20230322.bin
Then connect to the serial (UART) output of the VisionFive 2 (see the Quick Start Guide; on Linux and macOS, we recommend using minicom).
First, start the board in UART boot mode (see pictures below). You should see CCCCCCCCCCCCC on the serial port, which indicates that the board is waiting for an image to be uploaded.
Upload the recovery bootloader jh7110-recovery-20230322.bin.
On Linux with minicom, this is done by pressing Ctrl-A, then S, and uploading the file through XMODEM.
The recovery bootloader will then present a menu with multiple options to re-flash the board.
Select option 2 (update fw_verif/uboot in the flash).
Once again, the serial output will print CCCCCCCCCCCCC. This time, upload the Miralis FIT image from the previous section (miralis_visionfive2.img).
Finally, reboot from the flash (see picture below).
You should now see logs from Miralis on the serial port followed by OpenSBI: Miralis has been successfully installed and OpenSBI is running in virtual M-mode.
| UART boot | Flash boot |
|---|---|
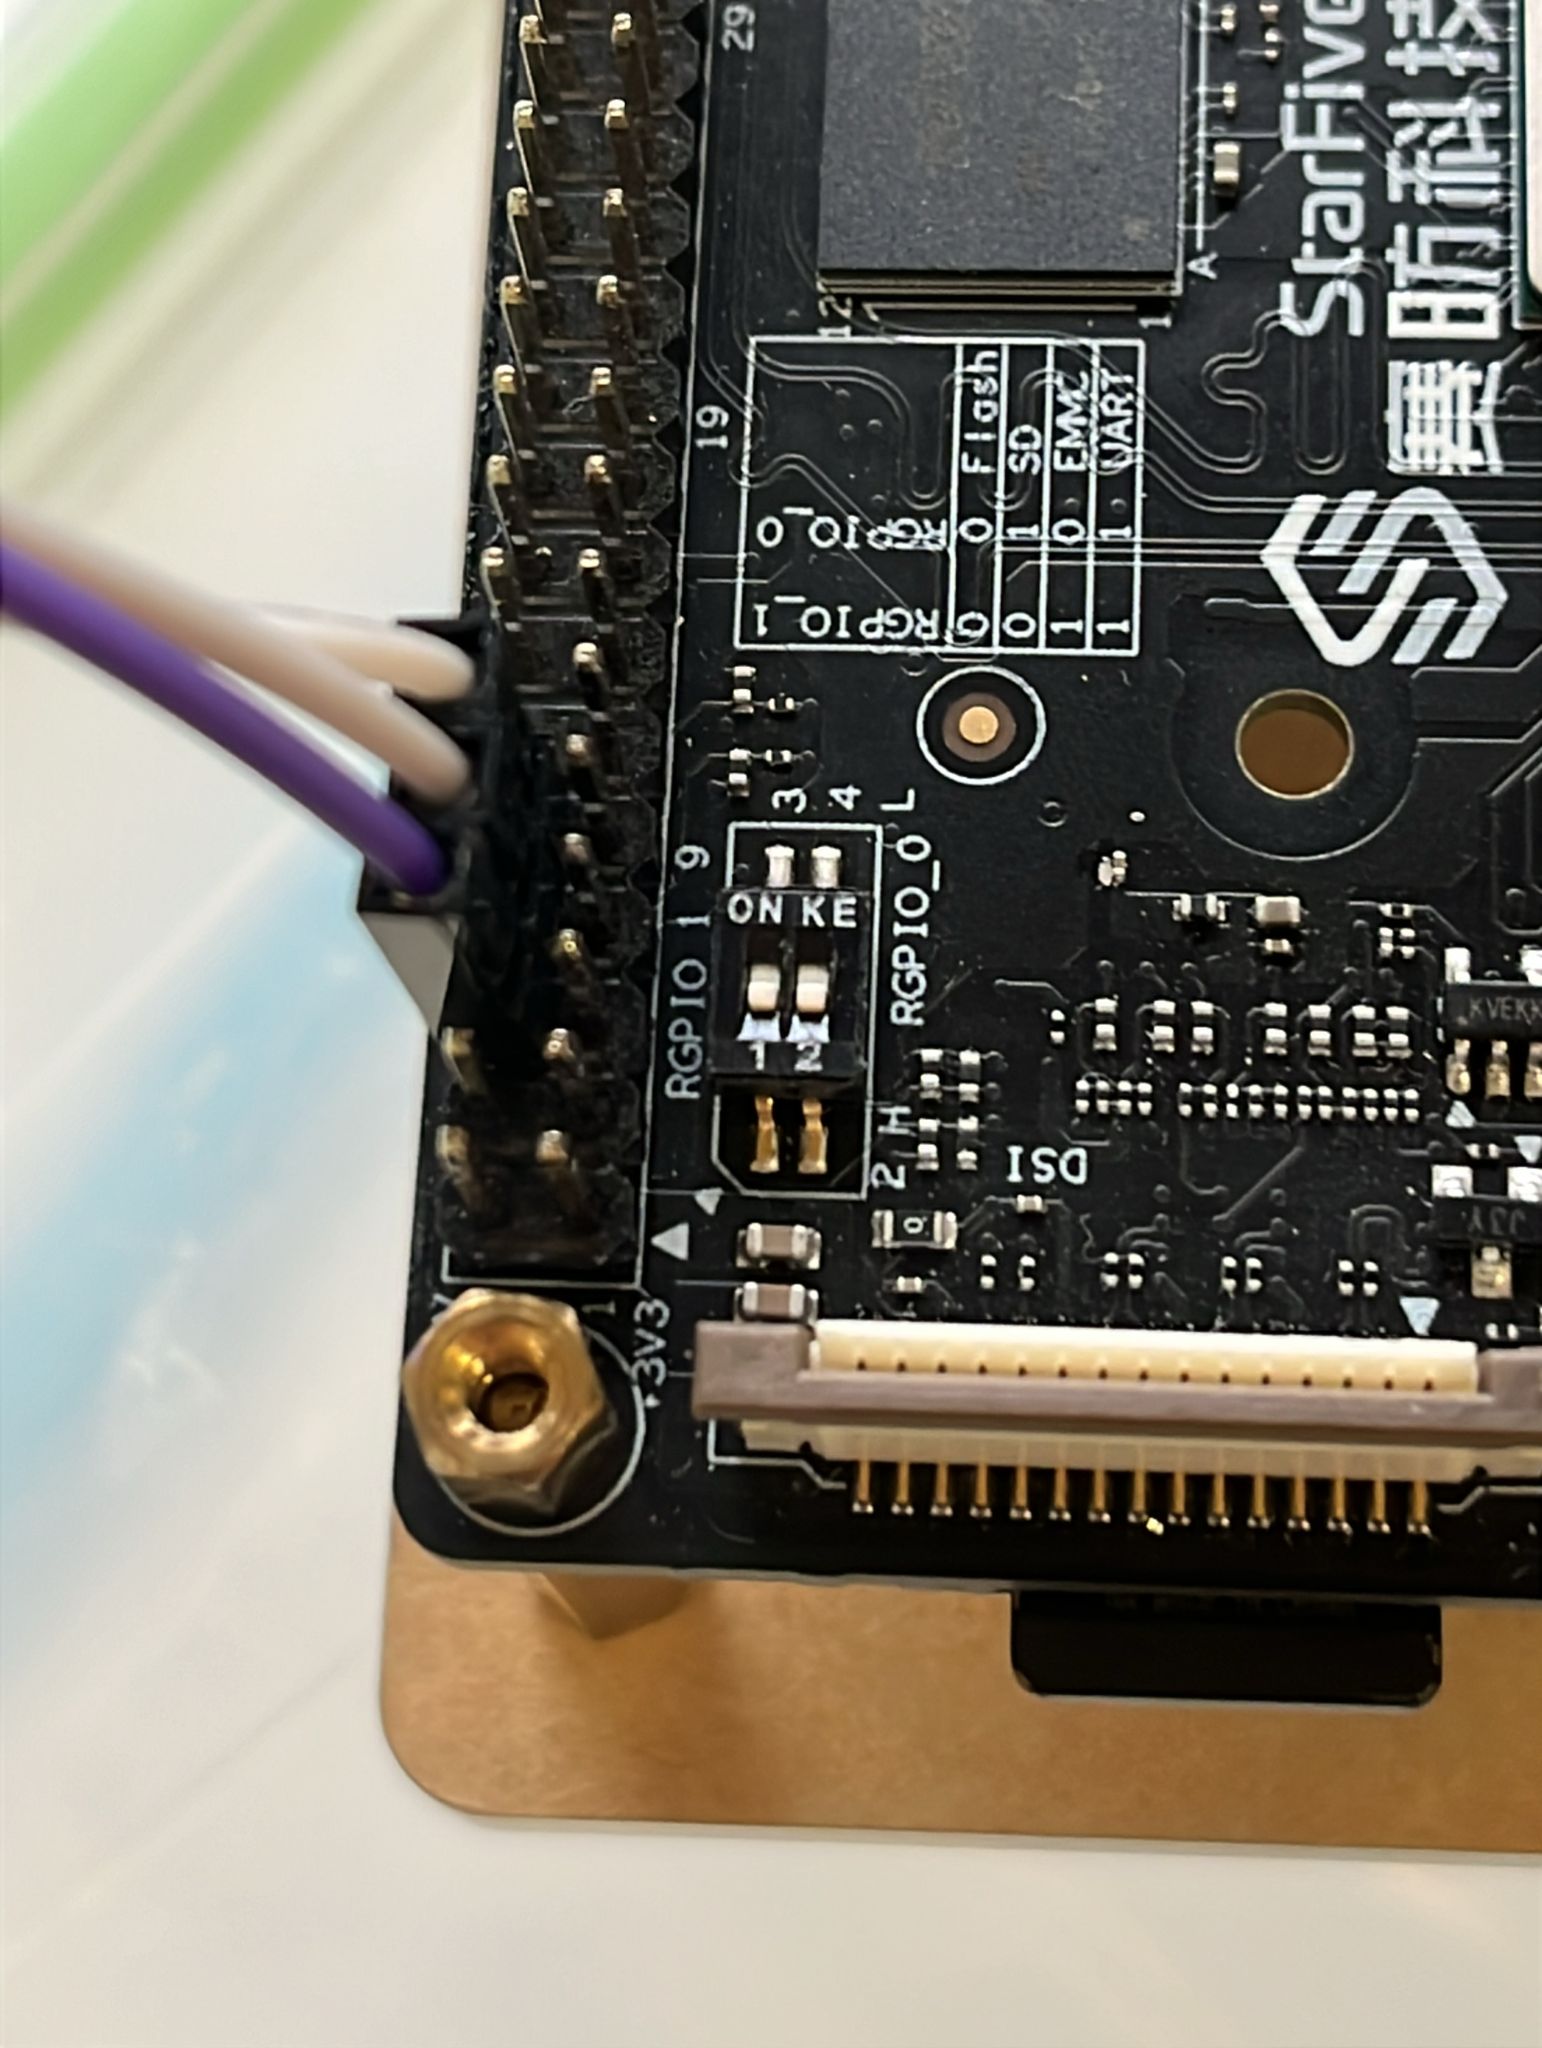 | 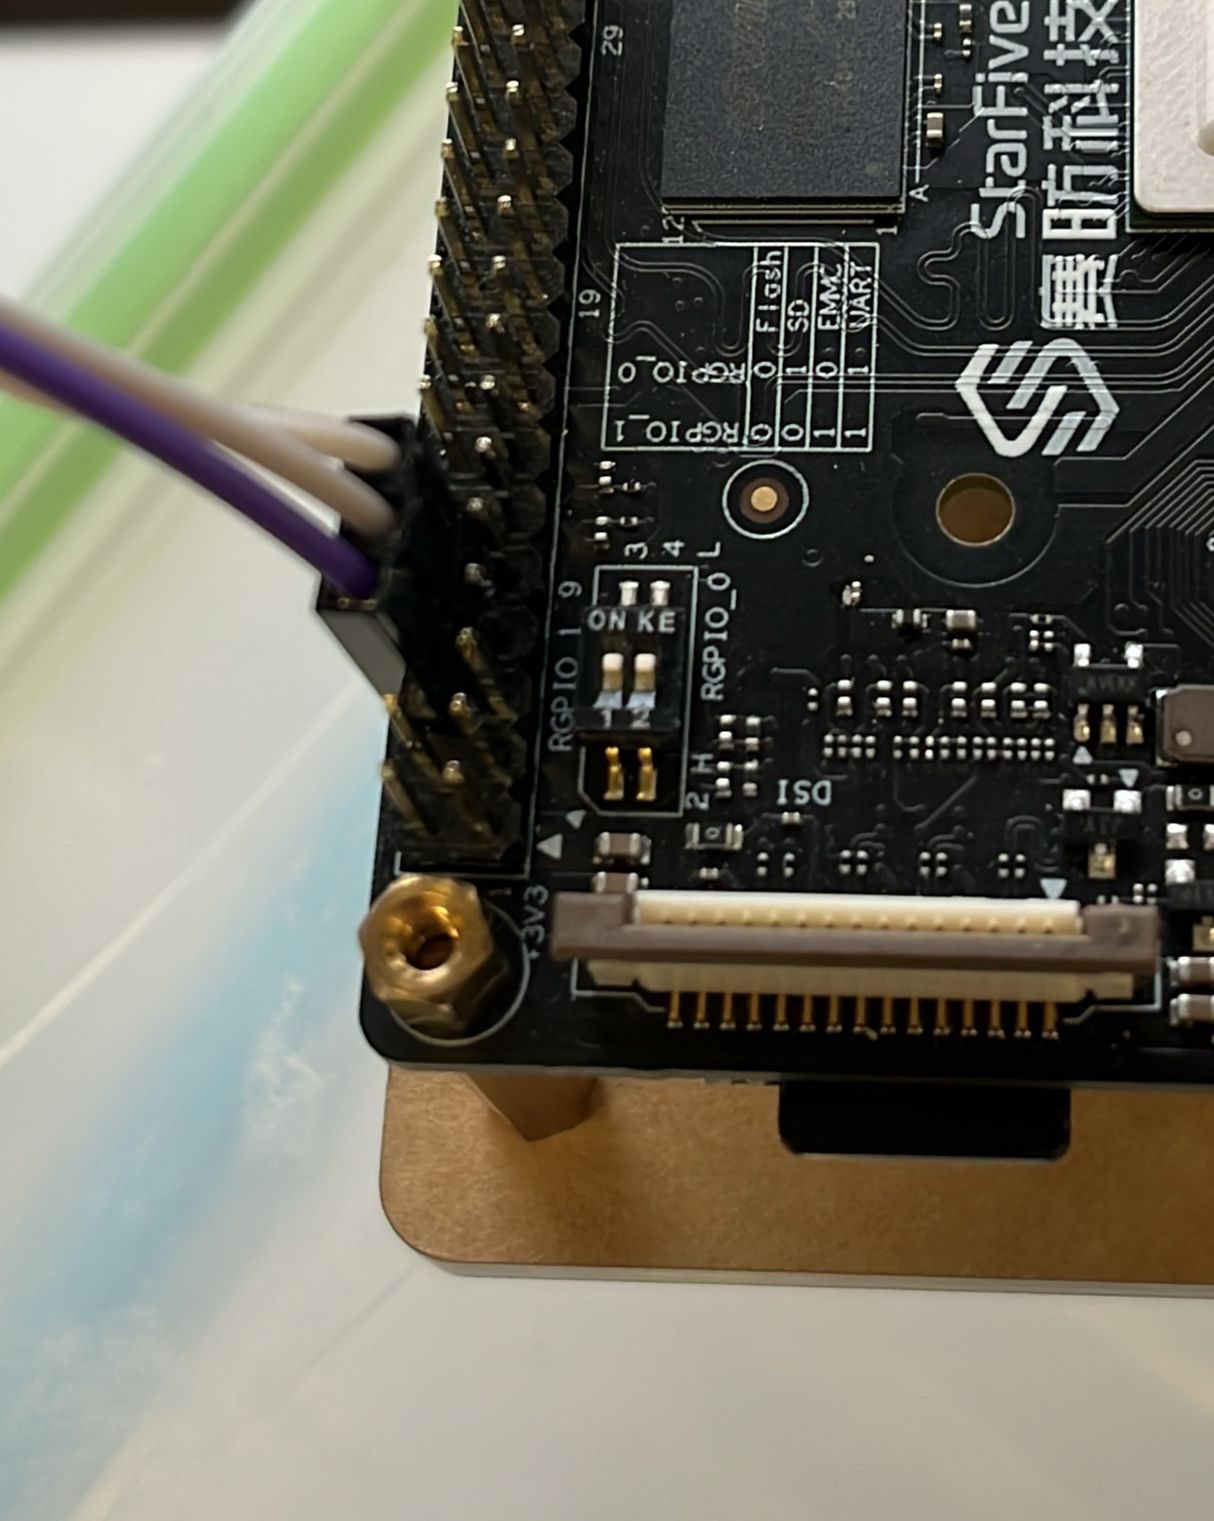 |
| Switches are near the numbers | Switches are away from the numbers |
Troubleshooting
Minicom:
If you get NAK on sector errors in Minicom, make sure you have the following settings:
F - Hardware Flow Control: Yes
G - Software Flow Control: No
On macOS, the XMODEM tools are not installed by default (and they do not come with minicom either).
To get minicom working, first install lsx.
Then in minicom, change the XMODEM program to lsx -vv.